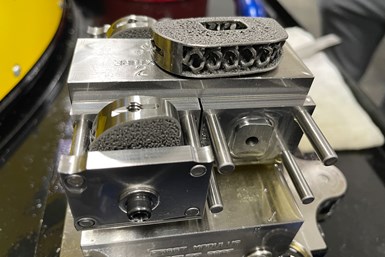
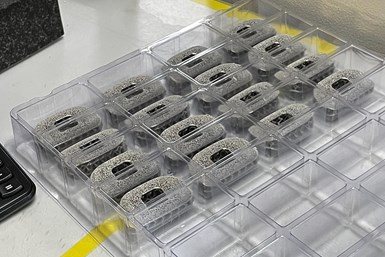
RMS produces as many as 20,000 3D-printed titanium implants, such as these spinal implants, per month on 30 powder bed fusion machines. All of these parts require finishing at a machine shop the company has set up specifically for additive parts.
As a medical device manufacturer, the RMS additive division’s goal is to provide all of the services needed to additively manufacture implants from “powder to package.” A big part of this capability is machining. “Every additive part we make, we machine,” says Troy Olson, director of operations for the company’s additive group.
“Every additive part we make, we machine,” says Troy Olson, director of operations for the additive group at RMS.
Before starting its additive division, RMS had a solid background in subtractive manufacturing. The company has been machining parts for more than 50 years, and currently has over 650 machine tools performing operations from Swiss-type turning to five-axis milling. However, RMS has learned that this experience does not always apply to 3D-printed parts. In fact, the pacing and workflows are so different from subtractive parts that the additive division needed a separate, dedicated machine shop with its own employees. “We didn't want additive screwing up what's already an industry-leading machine shop,” explains Ryan Kircher, senior additive manufacturing engineer.
Featured Content
Where conventionally manufactured parts require machining away as much as 90% of the stock, additive parts are already near-net shapes that need basic operations such as drilling, tapping and machined instrumentation slots. Cycle times are much faster. Depending on the number of machined features on a part, employees could be machining between six and 20 parts per hour and switching machines over as many as two or three times per day. In addition to the differing workflows, finish-machined additive parts need to be handled differently because they are more expensive to scrap. The entire process is designed to produce zero scrap.
Two Processes Are Better Than One
The shop’s five-axis machines, multi-spindle lathes and other advanced machine tools produce complete parts. Additive parts are different in that 3D printing alone is not enough. In fact, all of RMS’s additively manufactured parts require finish machining.
“When we looked into additive manufacturing, we looked at it as a complementary technology, not a sole technology,” Olson says. Kircher says he has seen many of the pitfalls of treating AM as a standalone technology in his previous experience working with additively manufactured implants. “You had to make compromises in the design to accommodate additive manufacturing or set up these horrible manual postprocessing steps like deburring, support removal and hand tapping of threads that were almost printed right.” By using both processes, RMS can efficiently and cost effectively manufacture implants without compromising on design.
Setting Up Shop
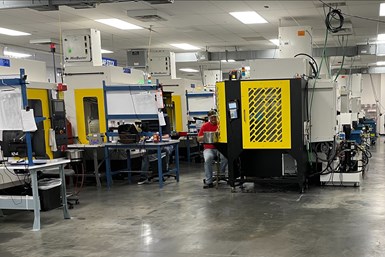
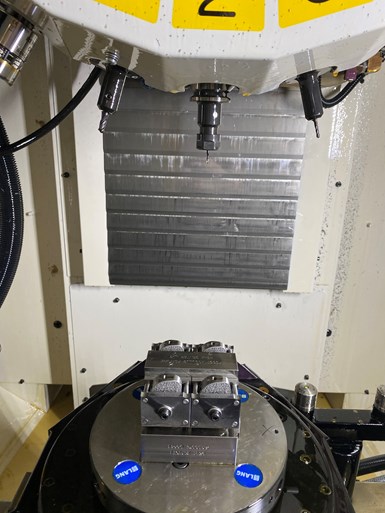
The additive machine shop is led by Aaron Glanz and consists of eight machinists on first shift, seven on second, and two on the weekends with plans to add more. Equipment in the additive machine shop is standardized, just like the rest of the company, for maximum flexibility. It has 12 FANUC Robodrills, along with three CUT AM 500 horizontal EDMs, which are specially designed by GF Machining Solutions for removing 3D printed metal parts from their build plates. The additive division also has a Haas VMC that is dedicated to resurfacing build plates, and a Haas lathe for machining AM test specimens.
All of the parts from a build plate travel together through downstream operations as a lot. Each lot requires a separate setup in the machine shop, including first and last piece inspections and full line clearance.
Subtractive Workflows for Additive Parts
However, the machining process for additively manufactured parts begins before they reach this area of the shop. The same employees who are responsible for running the printers are also responsible for separating the parts and then resurfacing the build plates.
After being separated from the build plate, the parts are sent out for hot isostatic pressing (HIP) and returned to RMS for machining. Between the printing and the HIP, the parts have had a lot of value added to them at this point, so the machinists need to be very careful not to scrap them. “Aaron has built his machining group around zero scrap — fixturing, probing, standardized tooling, standardized programming – so that we don't print a part to sacrifice for setup of the machining operation,” Olson says. Despite the relatively small amount of material that’s removed from these parts in machining, it is critical to get it right.
Based on his own experience, Glanz says adopting a zero-scrap mindset can be a challenge after working in RMS’s subtractive divisions. “You're taking machinists from the floor that are used to using barstock,” he says. “If a machine tool operator makes a mistake you can just run back to the stockroom. You have to instill in the operators that this is not possible with printed parts. Imagine the stockroom being three weeks’ travel time away.”
Machinists in the additive shop also must adjust to the increased number of setups. Orders for additive parts are broken down into build plate quantities. For example, an order for 1,000 parts might require 10 to 15 build plates. Each build plate typically holds between 75 and 100 parts, which travel together as a lot through post-processing operations, including machining. However, this means that each build plate is its own setup. “Rather than setting a job up one time and running for 1,000 parts, Aaron is setting that job up 10 to 15 times to run the same 1,000 parts because everything comes to him in a lot,” Olson says. “At a minimum, each lot has to have a first piece, inspection, a last piece inspection, and a full line clearance.”
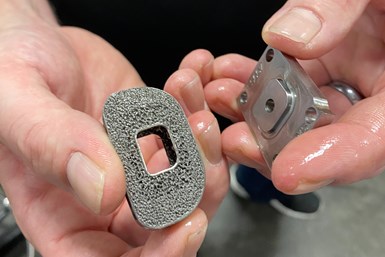
All of the 3D printed implants have specially designed bone ingrowth surfaces that are very intricate and cannot be damaged or contaminated. Designing workholding fixtures for these parts is a major challenge.
Workholding
One of the biggest challenges in machining additively manufactured parts is workholding. “Machining an additive part is complicated because it's not a piece of barstock where you have nice datums and can hog it out,” Kircher says. “You have to figure out where this part is in space, and make sure these features you're machining on the part are in the right spot. It's not trivial when it's already 90% of the way manufactured.”
Further complicating this is the fact that all of the parts RMS 3D prints are implants with features designed for bone ingrowth that cannot be produced by conventional processes. “That's the technology our customers are designing into their implants that we cannot damage or contaminate,” Glanz notes. These surfaces can be so intricate that they cannot even be touched with a piece of cloth. “We have to work fixturing around all that, and make sure we are not marking up their surface technology,” he adds. For example, the company designed a workholding fixture for one of its spinal implants around a hole in the middle of the part. The fixture grips this feature and holds the parts steady without damaging the surface while extra stock is machined off the ends.
3D printed implants require machining only a small amount of material. However, scrap can be costly because these parts have a lot of value added to them by the time they reach the machine shop.
Ideally, RMS can provide input during the design phase to reduce these challenges. “When we can get engaged with our customers early on, we'll actually design the part around workholding and datum structures for post machining,” Olson says.
Despite the differences between machining additive parts and machining parts from stock, the team agrees that its experience in conventional manufacturing has been key to what it has accomplished with AM, given the challenges of machining these parts. “I think it takes a very experienced subtractive manufacturing team to complement additive manufacturing and make it successful,” Kircher says.
RELATED CONTENT
-
Read Your Chips: Understanding Tool Selection for Unattended Turning
Are you sure you have the best insert for that turning operation? Check the chips, especially if you are running unattended. Chip characteristics can tell you a lot.
-
Centerless Grinding: Not Magic!
Achieving consistent and quality results from the centerless grinding process requires an understanding of the basic fundamentals. Most application problems associated with centerless grinding derive from a misunderstanding of the basics. This article explains why the centerless process works and how to use it most effectively in your shop.
-
Understanding Swiss-Type Machining
Once seen as a specialty machine tool, the CNC Swiss-type is increasingly being used in shops that are full of more conventional CNC machines. For the newcomer to Swiss-type machining, here is what the learning curve is like.





.1692800306885.png)

.1687801407690.png)
