Digital Comparators are More Than Just Readout Devices
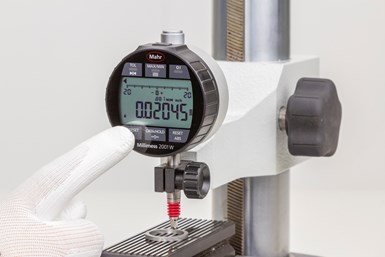
Modern digital comparators often combine the performance of touchscreen phones, LVDTs, digital amplifiers and even small PCs into the size of a standard dial indicator.
#qualitygagingtips
Digital comparators are one of those devices whose full potential is rarely appreciated by their owners. Digital comparators are often used simply as replacements for dial indicators or old Mikrokators where a higher degree of resolution is required. This ignores numerous opportunities to make gaging more efficient and productive.
Today’s digital comparators often combine the performance of touchscreen phones, linear variable differential transformers (LVDTs), digital amplifiers and even small PCs into the size of a standard dial indicator. Features typically delegated to bench amplifiers or electronic column gages now fit into a compact but powerful, all-in-one readout device.
Featured Content
With an LVDT integral with the display, modern digital comparators combine the typical probe and bench amplifier into one compact unit. Since an LVDT is the basis for the comparator, selectable resolutions of 0.1 μm are possible. Thus, one gets all the performance and power of the bench amplifier in a compact device with a lot more value.
Despite the rugged design, putting any electronic device on the shop floor at the point of manufacture is always a bit of concern. Similar to a touchscreen phone, digital comparators eliminate buttons, which can be a major source of potential contamination. A sealed touchscreen bezel, even operated with gloved hands, eliminates sources of ingress, and with the marking under the glass, there is no chance of the labeling being erased by harsh chemicals.
Most digital comparators also incorporate dynamic measurement capabilities, including minimum, maximum, and total indicated reading (TIR) functions. The comparator “remembers” the highest and lowest points measured on a part and displays either or both or subtracts the minimum from the maximum to calculate TIR.
This is useful when gaging round parts in a V-block fixture or measuring the height of a flat surface. The operator can quickly turn a shaft through a complete revolution or move a flat part around under the gage head without pausing to read the display. When manipulation of the workpiece is complete, the operator may select to display the maximum or minimum ID, OD, height, depth or runout.
Other advanced functions can speed gaging setups. The “auto-zero” function is the electronic equivalent of the rotating bezel on mechanical dial indicators: the operator brings the gage head into rough contact with the master and simply zeroes the comparator, eliminating the need for ultra-careful positioning of the gage head.
A “master deviation” function enables the addition of a known master offset to the zero setting. Say your spec calls for a nominal dimension of 1.99980 inch, but you’ve only got gage blocks handy for 2.00000 inches. No problem. Simply set your zero at 2.00000 inches, master the gage, program in a deviation of +.00020 inch to all measurements and voila! Quick and easy mastering without the hassle of post-measurement arithmetic.
Furthermore, a “preset value” enables switching between comparative and absolute measurements. In other words, instead of gaging deviation from the nominal, the comparator displays actual part dimensions. (In the above example, if a part is .00010 above nominal, the display will read 1.99990 inch.)
The digital comparator also enables the user to establish tolerance limits, and some incorporate green, amber and red lights to indicate “in tolerance,” “approaching limits,” and “out of tolerance” conditions. Data can be transmitted to data collection systems through digital output ports. These digital output ports represent a great benefit of modern comparators. With some integrated wireless features built-in, they can eliminate the need for wired cabling and transferring data directly into data collection systems.
However, not all digital comparators incorporate the features listed here. When selecting a new comparator, one can readily identify the product features needed to meet the requirements of the application. For those currently using high-resolution dial indicators or dial comparators, it may be worthwhile for the performance of a digital comparator to determine if the process may be updated and improved and provide more information for the user.
RELATED CONTENT
-
How to Choose the Correct Measuring Tool for Any Application
There are many options to choose from when deciding on a dimensional measurement tool. Consider these application-based factors when selecting a measurement solution.
-
Electronic Bore Gage Automates Bore Data Acquisition
This new portable gage provides precision measurement and verification of custom parts with integrated data collection.
-
How to Evaluate Measurement Uncertainty
Manufacturing and measurement are closely coupled. An important consideration for the use of measurement results is the associated measurement uncertainty. This article describes common metrology terms and provides an example uncertainty analysis.


.1692800306885.png)


.1687801407690.png)
