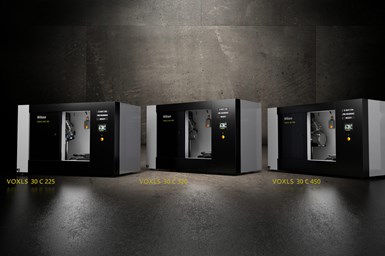
Nikon Metrology Systems Provide Non-Destructive Inspection
The VOXLS 30 C 225, 30 C 320 and 30 C 450 models are designed for automated operations across the production sector.

Nikon Metrology has launched three new models in its VOXLS range of X-ray computed tomography (CT) systems for non-destructive inspection. The 30 Series is designed for users looking for an automation-ready system with the versatility to meet a wide range of industrial applications.
The VOXLS 30 C 225, 30 C 320 and 30 C 450 models have maximum source energies of 225 kV, 320 kV and 450 kV, respectively, for examining parts of various densities and sizes. They also have a more compact footprint than Nikon’s 40 Series while maintaining advanced features traditionally exclusive to larger, more expensive solutions.
The systems are designed for automated operations across the production sector, especially for quality control in factories producing lithium-ion batteries or additively manufactured components. The automotive, aerospace, medical and pharmaceutical industries are additional target markets, and many applications will also be found in materials science, natural sciences and academia.
At the core of this series is a metrology-grade, granite-based manipulator coupled with rigid steel towers, which provides a thermally stable and solid construction. High-precision motors, ballscrew drives and encoders provide precise positioning and accurate movement of all axes, including the synchronous vertical motion of the X-ray sources and detectors.
The 30 Series systems feature extensive CT acquisition technologies and reconstruction algorithms, including X.Tend Helical CT, Offset.CT, Panel Shift, Pixel Split CT, Half.Turn CT and Tilted CT.
According to Nikon, the 30 Series’ 225 kV model offers an industry-leading scan volume within its size class, while all models offer maximum scanning volumes of more than 600 mm diameter by more than one meter high. The systems are powered by Nikon’s X-ray source technology, including its specialized 225 kV Rotating.Target 2.0 and 450 kV reflection target.
The 30 Series cabinets utilize a manipulator-interlocked, glass outer door to give the operator visibility into the enclosure when the inner radiation safety doors are open. This design enables confident positioning of the scan object, minimizing the risk of collision with the X-ray source and detector while also providing a physical safety barrier between the operator and the moving manipulator. Multiple internal, high-resolution video cameras provide a view even with the inner radiation safety doors shut and X-rays on. The systems also feature motorized bi-parting radiation doors that open and close in less than five seconds, behind which the cabinet interior can accommodate items up to 1,000 mm in diameter by 1,370 mm tall.
RELATED CONTENT
-
A Case for Combining Workholding with Optical Scanning
Automotive dies and die inserts are often complex, one-off parts with little room for error. Integrity Tool's investments in modular workholding tools and 3D optical scanning have allowed the company to create niche capabilities for its CNC machined parts.
-
Properly Reading Dial Indicators
Dial indicators provide useful readings about tolerance ranges at a glance — but new users need to know how to set up these indicators before using them.
-
Dial vs. Test Indicators
Dial and test indicators are close cousins. They are both mechanical magnifying devices used for dimensional comparison.


.1692800306885.png)


.1687801407690.png)
